Introduction
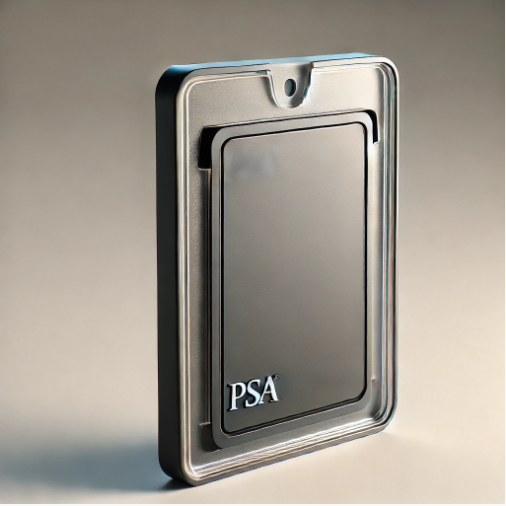
Protection is the first concern for trading card collectors—especially those with PSA-graded cards. Although PSA slabs provide outstanding protection against wear and tear, collectors sometimes want more security for their valuable items. Here’s where a 3D-printed PSA card bumper finds application.
A PSA card bumper is a custom-designed protective frame that fits around the PSA slab, offering extra durability, impact resistance, and display appeal. With 3D printing, collectors can customize their PSA card protectors to match their style, color preferences, and collection themes.
This guide will take you through everything you need to know about 3D printing a PSA card bumper, including design considerations, best materials, print settings, and finishing tips.
Why Use a 3D-Printed PSA Card Bumper?
1. Added Protection
A PSA slab protects the card inside, but accidental drops, scratches, and pressure damage can still occur. A 3D-printed bumper adds an extra layer of defense.
2. Customization and Visual attractiveness
Customizable bumpers with logos, color schemes, or text engravings reflecting the theme of your collection are made possible with 3D printing.
3. Reasonably priced solution
3D printing presents a reasonable substitute for costly protection gear. Printing several bumpers at a fraction of the cost of premium protectors will pay off.
4. Lightweight & Non-Intrusive
A well-designed bumper protects without adding excessive bulk, ensuring easy storage and stacking for collectors with large inventories.
5. Easy Replacement
If a bumper breaks or wears out, simply print a new one rather than repurchasing expensive protection solutions.
Best Materials for 3D-Printed PSA Card Bumpers
Choosing the right filament ensures durability, flexibility, and aesthetics for your PSA card protector.
1. PLA (Polylactic Acid)
- Pros: Easy to print, cost-effective, smooth finish.
- Cons: Brittle under stress, not very flexible.
- Best for: Casual collectors seeking affordable protection.
2. PETG (Polyethylene Terephthalate Glycol)
- Pros: Strong, flexible, impact-resistant.
- Cons: Requires precise printing settings.
- Best for: High-impact protection, frequent handling.
3. TPU (Thermoplastic Polyurethane)
- Pros: Flexible, shock-absorbent, durable.
- Cons: Harder to print, requires slow speeds.
- Best for: Maximum protection against drops.
4. ABS (Acrylonitrile Butadiene Styrene)
- Pros: Strong, heat-resistant, durable.
- Cons: Prone to warping, requires a heated print bed.
- Best for: High durability and professional-grade protection.
Designing a 3D-printed PSA Card Bumper
Creating a three-dimensional printed PSA card bumper
Design a PSA card bumper keeping these important factors in mind:
1. Exact Dimensions
Make sure the bumper easily inserts and removes itself while fitting tightly around the PSA slab.
2. Shockabsorption and edge protection
Add shock-absorbing padding and strengthened corners to reduce harm from inadvertent falls.
3. Slide-in design or secure snap-fit
- A good design should incorporate:
- Secure grip with snap-fit clips.
- Simple removal of slide-in grooves.
4. Display characteristics
- Think of including kickstands for a straightforward display.
- Creating wall-mounted collections from hanging holes.
- Custom branding or engravings particular to collectors.
How to 3D Print a PSA Card Bumper – Step-by-Step Guide
Step 1: Download or Create a 3D Model
- Search for STL files on Thingiverse, MyMiniFactory, or Cults3D.
- Use CAD software like Fusion 360 or Tinkercad to design a custom bumper.
Step 2: Slice the Model
- Recommended slicer settings:
- Layer height: 0.2mm for smooth finish.
- Infill: 15-30% for durability.
- Supports: Only if needed for overhangs.
- Print speed: 40-60mm/s.
Step 3: Print the Bumper
- Ensure proper bed adhesion using a brim or raft.
- Monitor the first few layers to prevent warping.
Step 4: Post-Processing & Finishing
- Sand edges for smoothness.
- Paint & polish for a professional look.
- Test fitment before regular use.
READ MORE – 3D Print a Huge Dice Tower – The Ultimate Guide for Gamers
FAQs
1. Are 3D-printed PSA card bumpers durable?
Yes! Using strong filaments like PETG or TPU ensures long-lasting protection.
2. Can I design a custom PSA bumper?
Perfect! You can customize size, color, and engravings using CAD software before printing.
3. What’s the best material for impact resistance?
TPU or PETG are the best choices due to their shock-absorbing properties.
4. Where might I locate PSA card bumper 3D models?
For both free and premium designs, check Thingiverse, Printables, or Cults3D.
5. A PSA bumper prints in five seconds?
A PSA bumper usually prints 2–5 hours depending on size and print settings.
Conclusion:
A 3D-printed PSA card bumper is an affordable, customizable, and durable solution for protecting PSA-graded cards. Perfect bumper specifically for your collection can be produced with appropriate design, materials, and printing methods.
Start your PSA card bumper print right now to make sure your priceless cards stay in perfect shape!


